
SwiftUI and Flutter are frameworks for creating user interfaces for mobile applications. Both frameworks are based on the concept of declarative programming, in which developers describe what the user interface should look like and not code every element of it.
The primary difference between these frameworks is, of course, that SwiftUI is used to create native, high-performance applications for Apple platforms. Conversely, Flutter is a great choice for developers who want to create applications for various platforms. SwiftUI supports the Swift programming language, which Apple created to support platforms such as iOS, iPadOS, and macOS. Flutter is written in the Dart language, which is supported by various platforms, including iOS, Android, Windows, macOS, and Linux. In other words, SwiftUI cannot be used to create Android or Windows applications.
SwiftUI is considered a more efficient technology than Flutter. This is because it is native to Apple platforms, while Flutter is a cross-platform solution.
So, are there any similarities? Let’s start by explaining what is SwiftUI and how it works.

What is SwiftUI?
SwiftUI as a framework was introduced in 2019, so it’s two years younger than Flutter.
It is a modern tool to declare UI for any Apple platform. It makes creating beautiful and dynamic apps much faster than before. It provides views, controls, and other layout structures. Views are basic building blocks of an app (similar to widgets in Flutter), such as labels, buttons, or text fields. Controls are more complex views with specific functionality, such as scrolling or swiping. Layout structures are used to organize views and controls in space.
SwiftUI, like Flutter, uses a declarative syntax, so you can simply state what your user interface should do. For example, you can write that you want a list of items consisting of text fields, then describe alignment, font, and color for each field. Your code is simpler and easier to read than ever before, saving you time and maintenance.
This declarative style even applies to complex concepts like animation. You can easily add animation to almost any control and choose a collection of ready-to-use effects with only a few lines of code. At runtime, the system handles all of the steps needed to create a smooth movement, even dealing with user interaction and state changes mid-animation. With animation this easy, you’ll be looking for new ways to make your app come alive.
SwiftUI is available on all Apple platforms, including iOS, iPadOS, macOS, tvOS and watchOS. This means you can create apps that work on all Apple devices using a single set of tools and APIs.
For more information, you should read the official documentation.
Data flow in SwiftUI
@State
The most basic way to preserve and change the state of a view is to add a variable marked with @State. Similar to Stateful Widget in Flutter @State property wrapper allows you to store the state in a given view and to rebuild the view when that state changes
Marking a variable as @State allows you to store state data in views. The state can change over time and be reflected in the view. You can store data such as form field values, switch states, etc.
So, for example, the counter known from the Flutter starting project may look like this:
import SwiftUI
struct ContentView: View {

    @State var counter: Int = 0

    func increment () {
        self.counter += 1
    }

    var body: some View {
        VStack {
            Text("You have pressed button this many times:")
                .padding()

            Text("\(counter)")
                .font(.system(size: 36))

            Button(action: increment) {
                Text("Increment!")
                    .foregroundColor(.white)
                    .padding()
                    .background(Color(.gray))
                    .cornerRadius(10)
                    .padding()

            }
        }
    }
Now, for comparison, in Flutter, it looks like this:
import 'package:flutter/material.dart';
class CounterPage extends StatefulWidget {
  const CounterPage(this.title, {super.key});
  final String title;
  @override
  State<CounterPage> createState() => _CounterPageState();
}
class _CounterPageState extends State<CounterPage> {
  int _counter = 0;
  void _incrementCounter() {
    setState(() {
      _counter++;
    });
  }
  @override
  Widget build(BuildContext context) {
    return Scaffold(
      appBar: AppBar(
        title: Text(widget.title),
      ),
      body: Center(
        child: Column(
          mainAxisAlignment: MainAxisAlignment.center,
          children: <Widget>[
            const Text(
              'You have pushed the button this many times:',
            ),
            Text(
              '$_counter',
            ),
          ],
        ),
      ),
      floatingActionButton: FloatingActionButton(
        onPressed: _incrementCounter,
        tooltip: 'Increment',
        child: const Icon(Icons.add),
      ),
    );
  }
}
As you can see, @State properties hold the value that a given view depends on.
State properties represent a value that can change, and when it changes, the view updates based on the new value. It is essential to understand that they should be declared in the view that needs them. This is a one-way relationship, and the view reads the value from the field marked as @State and changes if there is a change in this field.
@Binding
The @Binding wrapper allows you to pass data from one view to another. In other words, it allows you to share the state between views.
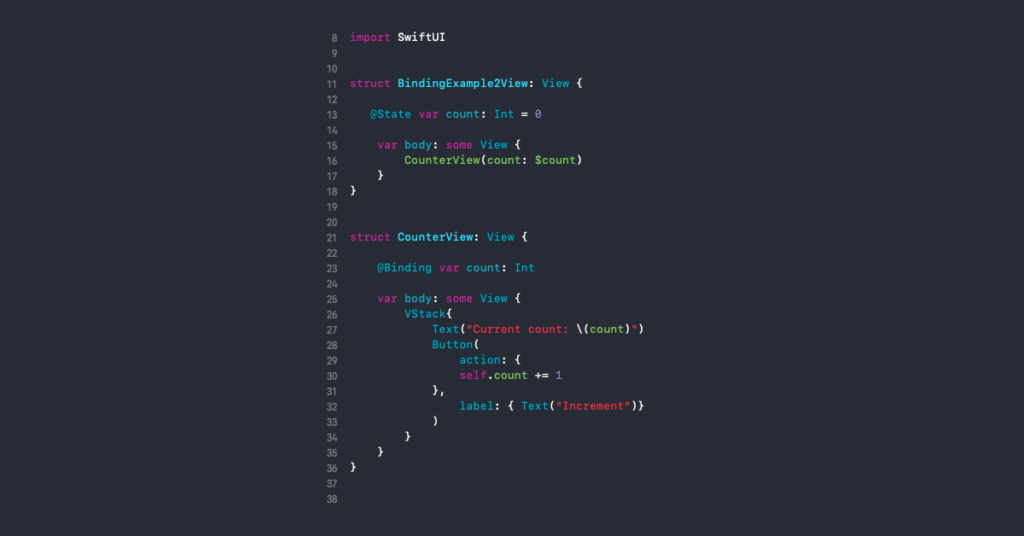
In the given example, the child view (CounterView) has access to the state of the parent view thanks to @Binding.
@Binding property wrapper is responsible for creating a two-way data flow. Another example would be a text field that changes the value of a variable with state.
import SwiftUI
struct BindingExampleView: View {
@State var userInput: String = "";
var body: some View {
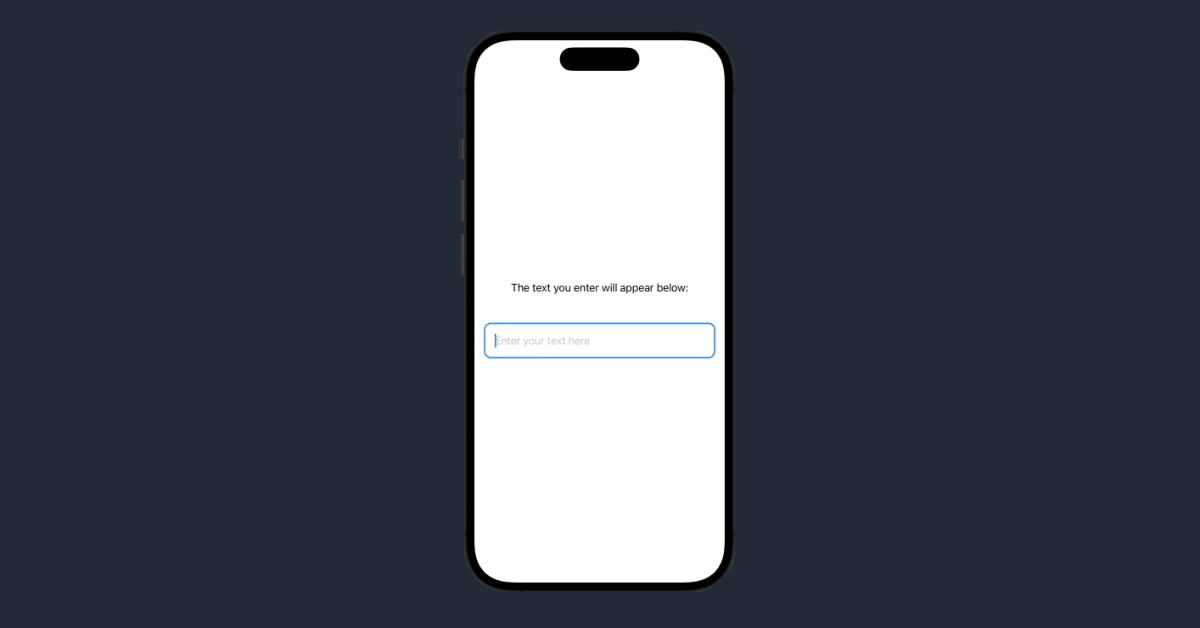
VStack {
Text("The text you enter will appear below:")
.padding()
Text("\(userInput)")
.font(.system(size: 36));
TextField("Enter your text here", text: $userInput)
.padding()
.overlay(RoundedRectangle(cornerRadius: 10)
.stroke(lineWidth: 2)
.foregroundColor(.blue)
).padding();
}
}Put $ in front of the state property reference in the view code (not in the declaration) to turn it into a two-way read/write relationship. This code example looks like this on preview:
So, adding @Binding property wrapper in your view indicates that it expects a binding to be passed to the view when it is instantiated. This allows the child view to modify the state property that is in the parent view.
@ObservableObject
Sometimes, you have a variable that is used by more than one view; in that case, you can use the @ObservableObject property wrapper. To do this, you need to implement the ObservableObject protocol in a given class. Additionally, you need to mark each field in the class that other views have access to as @Published.
class AuthViewModel: ObservableObject {
    @Published var userSession: FirebaseAuth.User?
    @Published var currentUser: User?
On every view, the reference to @ObservableObject must be marked as @ObservedObject:
@ObservedObject var profile = Profile()In Flutter, however, Dart doesn’t have the keywords public, protected, and private. If an identifier starts with an underscore _, it’s private to its library. Every Dart app is a library, even if it doesn’t use a library directive.
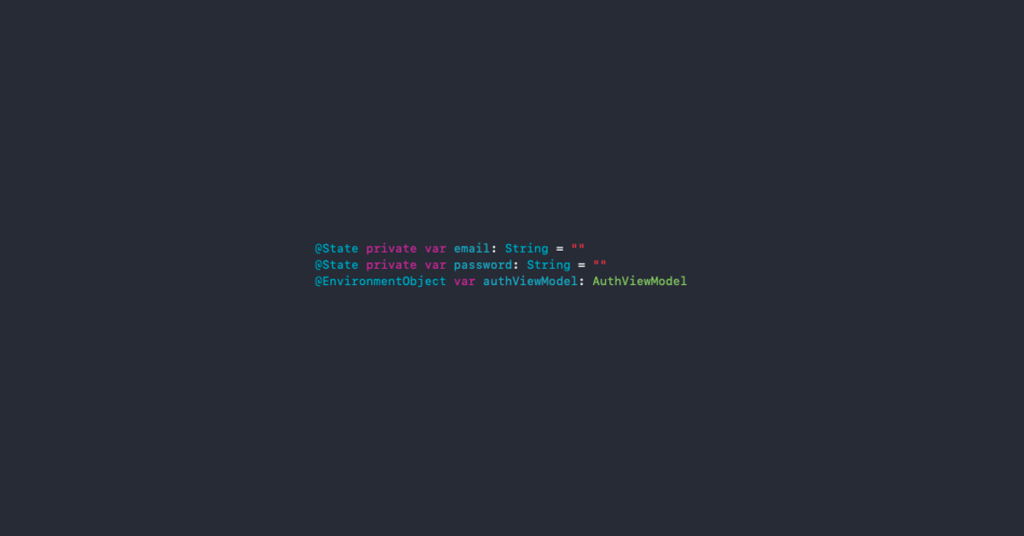
@EnvironmentObject
When we need to use an instance of one class or structure in many places in the application, it should be marked as @EnvironmentObject in the parent view. By doing that, we ensure the entire tree below that parent view will have access to this particular instance of that class. In practice, such an object is often initialized and registers itself in the App structure, making it available from anywhere in the application.
import SwiftUI
struct ContentView: View {

    @EnvironmentObject var authViewModel: AuthViewModel

    var body: some View {
        Group {
            if authViewModel.userSession != nil {
                HomeView()
            } else {
                LogInView()
            }
        }
    }
}
As you can see, there are some similarities to the data flow in Flutter. Both frameworks are based on the concept of state, which is stored in views in SwiftUI and widgets in Flutter. In both frameworks, when the state changes, the screen is refreshed with the value of the new state. In both cases, some views or widgets can store state, and some can not.
The architecture of Flutter applications
What divides the frameworks described is the architecture used to build the application. Flutter applications often feature clean architecture (which you can read more about in this article, while the MVVM pattern dominates SwiftUI.
Model-View-ViewModel is a design pattern that decouples the application’s business logic from the user interface.
Similar to clean architecture, this pattern divides the application into three layers:
- Model: The model layer stores application data and business logic.
- View: The view layer displays application data to the user.
- ViewModel: This layer mediates between the model and view layers. Stores data from the model and processes it to be available to the view layer.
This pattern has many advantages, including making testing and scaling your application easier.
Contact
Do you want to find out more about choosing the right tech stack for your mobile application?

Choosing between Flutter and SwiftUI for mobile app development
Both SwiftUI and Flutter offer compelling solutions for mobile app development, but they cater to different needs and ecosystems. SwiftUI, being Apple’s native framework, provides seamless performance and tight integration with iOS, iPadOS, macOS, and other Apple platforms. Its architecture is generally geared towards the MVVM design pattern, making it a natural choice for developers who are committed to the Apple ecosystem.
Flutter, on the other hand, shines in its ability to create cross-platform applications with a single codebase. Written in Dart, it offers flexibility and a wider range of deployment options, spanning iOS, Android, Windows, and more. While each has its own syntax and data flow mechanisms – be it SwiftUI’s @State and @ObservableObject or Flutter’s Stateful Widgets – they both share the common philosophy of declarative programming.
Ultimately, your choice between SwiftUI and Flutter will hinge on your specific needs, whether platform specificity or cross-platform support’s breadth. Either way, both frameworks are robust, feature-rich, and poised to make your app development journey rewarding.


