
Ever wondered how to make your Flutter app run smoothly while managing its memory and data? Here come Flutter Widgets. My first Flutter Hooks article discussed the primary and most commonly used hooks that come with the flutter_hooks package. But today, we will make a more technical comparison between stateful widgets and hook widgets.

What are stateful widgets, and why don’t we like them so much?
The official documentation says that: “Widgets are the central class hierarchy in the Flutter framework. A widget is an immutable description of part of a user interface. Widgets can be inflated into elements, which manage the underlying render tree.”
Widgets themselves have no mutable state (all their fields must be final). Suppose you wish to associate a mutable state with a widget. In that case, you should use a StatefulWidget, which creates a State object whenever it is inflated into an element and incorporated into the tree.
As we can read in the official documentation:
- A stateful widget is implemented by two classes: a subclass of StatefulWidget and a subclass of State.
- The state class contains the widget’s mutable state and the widget’s build() method.
- When the widget’s state changes, the state object calls setState(), telling the framework to redraw the widget.
To better understand what state is and where it is stored during the application’s life, we need to talk about the widget tree, element tree, and render tree.
Diving deep: Widgets tree vs. Elements tree vs. Render tree in Flutter
When we work with Flutter daily, write layouts, and add new functionalities to our application, we interact with the widget tree, but actually, when we run an app, Flutter will create an element tree and render tree for us.
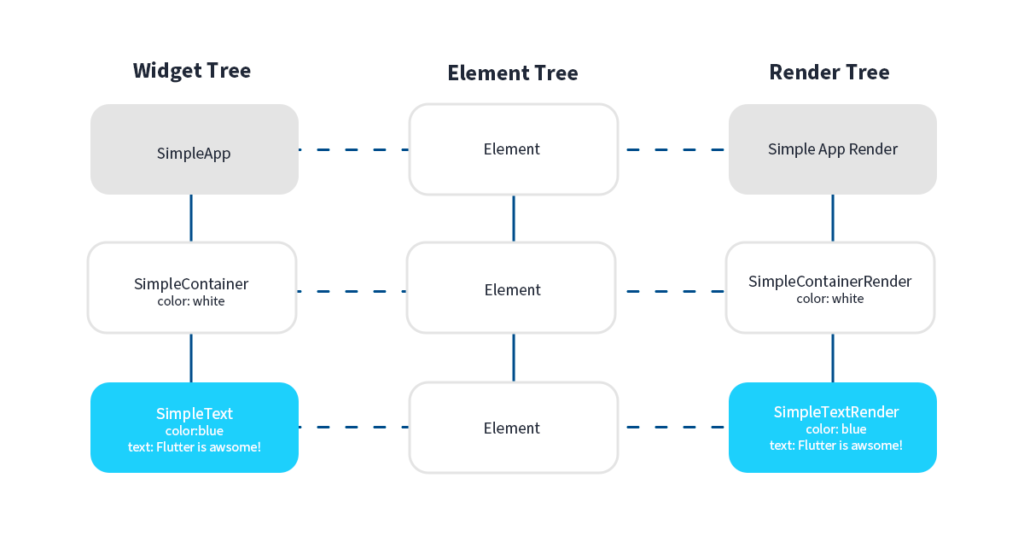
The key information here is: Every Element holds a reference to a Widget and RenderObject.
The RenderObject contains all the logic for rendering the corresponding widget and is quite expensive to instantiate. It takes care of the layout, painting, and everything you can see on the screen (luckily, we don’t have to manage it ourselves, Flutter does it for us 🎉). It’s a good idea to keep those objects in memory as long as possible since they are costly to instantiate.
That’s where the Elements come in. An Element is an instantiation of a Widget at a particular location in the tree. Widgets describe how to configure a subtree, but the same widget can be used to configure multiple subtrees simultaneously because widgets are immutable. An Element represents using a widget to configure a specific location in the tree.
Over time, the widget associated with a given element can change, for example, if the parent widget rebuilds and creates a new widget for this location. Basically, Elements are the glue between the immutable Widget tree and the mutable RenderObject tree. Elements are principally objects that are created for comparing two objects with each other, in our case, the widget and the rendered object. They represent using a widget to configure a specific location in the tree and keep a reference to the related Widget and RenderObject.
We already know that each Flutter app underneath uses the three trees described above, but what does it have to do with the state of our widget and, more importantly, Flutter Hooks?
The relationship between Flutter State and Hooks
State is information that might change during the widget’s lifetime. The framework creates State objects while calling the StatefulWidget.createState method when inflating a StatefulWidget to insert it into the Element tree. That’s right, and the state is stored in the Element tree.
Because a given StatefulWidget instance can be inflated multiple times (e.g., the widget is incorporated into the tree in multiple places at once), there might be more than one State object associated with a given StatefulWidget instance. Similarly, if a StatefulWidget is removed from the tree and later inserted into the tree again, the framework will call the createState() method again to create a fresh State object. The most important information here for us is that the State object is stored in the Element of the Widget, not in the Widget itself.
As we already know, Hooks are a new kind of object, provided by the flutter_hooks package, that manages the lifecycle of a Widget. They can only be used in the build() method of a widget that mix-in Hooks.
Similar to State, hooks are stored in the Element of a Widget. However, instead of having one State, the Element stores a List<Hook>. Then to use a Hook, one must call Hook.use.
Creating custom hooks in Flutter
As in the last article, we discussed using basic hooks provided with the package, and today we will write custom hooks. As you will soon see, custom hooks are very similar to stateful widgets in their structure. Let’s start with something simple.
TextEditingController is a frequently used widget that needs to be initialized in initState() and closed in dispose(). And keep this in mind every time you use it.
So let’s try to make a hook that will take care of it for us:
First, create a class that extends Hook; notice that Hook is a type of TextEditingController
class _TextEditingControllerHook extends Hook<TextEditingController> {
 const _TextEditingControllerHook();
Then we have to override a createState function:
 @override
 _TextEditingControllerHookState createState() => _TextEditingControllerHookState();
}
Next, we create another class that extends HookState, similar to State in StatefulWidget. This is where we put our logic, our initHook() (just like initState()) and dispose() methods:
class _TextEditingControllerHookState extends HookState<TextEditingController, _TextEditingControllerHook> {
 TextEditingController controller;

 @override
 void initHook() {
   super.initHook();
   controller = TextEditingController();
 }

 @override
 TextEditingController build(BuildContext context) {
     return controller;
 }

 @override
 void dispose() {
   controller.dispose();
   super.dispose();
 }
}
As you can see, the structure of the custom hook is almost identical to the Stateful widget, which is a good thing. It’s easy to learn to create custom hooks when it’s needed.
So we created our first custom hook, but… for those with little experience with the flutter_hooks package, this might seem pointless because this particular hook already comes with the package. We created this one for the sake of simplicity to better understand how custom hooks are created. Here you can find a link to an official repo with useTextEditingController. As you can see, it’s almost identical to the one we created.
Below you can find more real-life examples of custom hooks.
This useCameraController hook was created by Filip, one of Flutter developers at Applover, to be used with the camera package:
import 'package:camera/camera.dart';
import 'package:flutter/material.dart';
import 'package:flutter_hooks/flutter_hooks.dart';

CameraController useCameraController({
  required CameraDescription cameraDescription,
  required ResolutionPreset resolutionPreset,
  List<Object?>? keys,
}) =>
    use(
      _CameraControllerHook(
        cameraDescription: cameraDescription,
        resolutionPreset: resolutionPreset,
        keys: keys,
      ),
    );

class _CameraControllerHook extends Hook<CameraController> {
  const _CameraControllerHook({
    required this.cameraDescription,
    required this.resolutionPreset,
    List<Object?>? keys,
  }) : super(keys: keys);

  final CameraDescription cameraDescription;
  final ResolutionPreset resolutionPreset;

  @override
  HookState<CameraController, Hook<CameraController>> createState() => _CameraControllerHookState();
}

class _CameraControllerHookState extends HookState<CameraController, _CameraControllerHook> {
  late final controller = CameraController(
    hook.cameraDescription,
    hook.resolutionPreset,
    enableAudio: false,
  );

  @override
  CameraController build(BuildContext context) => controller;


  @override
  void dispose() => controller.dispose();

  @override
  String get debugLabel => 'useCameraController';
}
Notice that in both previous examples, overridden build() function returns a widget of the type previously specified as the type of the Hook instead of the Widget itself.
And here is the third example of a custom hook; it was used to create a controller for the mobile scanner package to conveniently manage the scanning of QR codes in one of our projects.
import 'package:flutter/material.dart';
import 'package:flutter_hooks/flutter_hooks.dart';
import 'package:mobile_scanner/mobile_scanner.dart';

MobileScannerController useMobileScannerController({
 bool autoStart = true,
 DetectionSpeed detectionSpeed = DetectionSpeed.normal,
 int detectionTimeoutMs = 250,
 CameraFacing facing = CameraFacing.back,
 List<BarcodeFormat>? formats,
}) {
 return use(
   _MobileScannerHook(
     autoStart: autoStart,
     detectionSpeed: detectionSpeed,
     detectionTimeoutMs: detectionTimeoutMs,
     facing: facing,
     formats: formats,
   ),
 );
}

class _MobileScannerHook extends Hook<MobileScannerController> {
 const _MobileScannerHook({
   required this.autoStart,
   required this.detectionSpeed,
   required this.detectionTimeoutMs,
   required this.facing,
   this.formats,
 });

 final bool autoStart;
 final DetectionSpeed detectionSpeed;
 final int detectionTimeoutMs;
 final List<BarcodeFormat>? formats;
 final CameraFacing facing;

 @override
 HookState<MobileScannerController, Hook<MobileScannerController>> createState() {
   return _MobileScannerHookState();
 }
}

class _MobileScannerHookState extends HookState<MobileScannerController, _MobileScannerHook> {
 late final MobileScannerController _controller = MobileScannerController(
   autoStart: hook.autoStart,
   formats: hook.formats,
   detectionSpeed: hook.detectionSpeed,
   facing: hook.facing,
   detectionTimeoutMs: hook.detectionTimeoutMs,
 );

 @override
 MobileScannerController build(BuildContext context) => _controller;

 @override
 void dispose() {
   _controller.dispose();
   super.dispose();
 }
}
As you can see, there is a repeating pattern of creating two classes, one extending Hook and the other HookState, just like in StatefulWidget and State.
You might wonder how you can use these custom hooks. Just like regular ones, adding them inside the build method of your widget:
 @override
 Widget build(BuildContext context) {

   final mobileScannerController = useMobileScannerController(
     autoStart: false,
     formats: [BarcodeFormat.qrCode],
     detectionSpeed: DetectionSpeed.noDuplicates,
     facing: CameraFacing.back,
     detectionTimeoutMs: 2000,
   );
Contact
Are you thinking about Flutter app development?

Embracing Hooks in State Management in Flutter
Hooks are a powerful tool worth learning to use for managing state. Along with the package, several hooks are available, which are sufficient in 85% of cases during everyday development. However, if a more specific case arises or there is a need to use an external package and link it to hooks, developers can easily create a custom hook to meet their requirements.


