
Over the years, the Apple App Store has grown, expanding its ecosystem and attracting more users as well as developers. When the developed application is finally ready, the last step is to publish it. The App Store provides its customers with applications that integrate perfectly with the capabilities of their devices. You have to take care of technical and legal requirements before submission. As scary as it may sound, the process isn’t complicated and with this article, you will be guided through the steps to publish your app to the App Store.
Checklist for submitting an iOS app
Before the publishing process on Apple’s App Store can begin, you should know about some of the requirements needed to successfully submit your iOS application. It’s important as the Apple review process is detailed and even a small hitch can cause rejection of your app.
For submitting an application to Google Play Store, see our recent blog post on how to publish an app on Google Play.

What is required to publish an iOS application?
Several prerequisites will be briefly covered in this section. It’s necessary to develop beforehand all the important information about your application. For this process, you need a computer that runs Mac OS X with Xcode installed. Moreover, apps submitted in 2021 must be built with the iOS 14 SDK. This is a critical element of the whole process of application development.
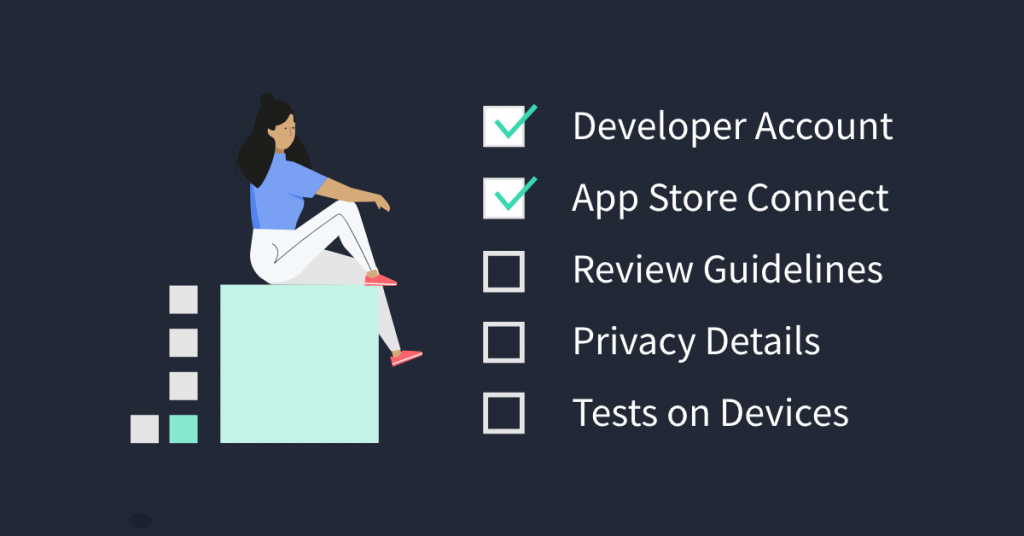
What you need to publish an iOS application is:
- have an Apple Developer Account,
- create an App Store Connect record for your app build (by signing in with the Apple ID you used to enroll in the Apple Developer Program),
- pass App Store Review Guidelines based on a set of technical, content, and design criteria,
- prepare App Privacy Details with all the information needed regarding the privacy practices (including the policies of partners whose code you integrate),
- all-screen support related to Human Interface Guidelines as well as tests of your app for any crashes and bugs.
How long does it take to publish an app to the App Store?
Check times might vary according to the app. On average, 50% of applications are tested in 24 hours and 90% over 48 hours. If your application is incomplete, it may delay additional periods or even reject your app. Upon examination of your app, it will update its status and notify you.
How much does it cost to publish an app to the App Store?
When you sign up as an individual organization, the cost to be approved for the developer account is $99 a year. It also provides app analytics, testing tools like TestFlight, and advanced app capabilities. Be aware that if you don’t renew your membership next year, your apps will be deleted from the App Store.
How to distribute iOS apps without the App Store?
It’s complicated to distribute iOS apps outside the App Store. Apple doesn’t allow you to directly download and install iOS application binary files (IPA). One of the solutions is to participate in the Apple Developer Enterprise Program. This allows you to distribute your app as a URL via your internal site or web server at the cost of $299 per year.
Publishing process on the App Store
Step 1: Add a new app in the App Store Connect
First, log in to App Store Connect where you can open My Apps and select the “+” option to create a new app.
You will be prompted to provide the following basic information when creating:
- Platforms – your target platforms for Apple’s devices;
- Name – the main application name (up to 30 characters), use keywords to optimize;
- Primary Language – the default language for your app;
- Bundle ID – must match the identifier in your Info.plist Xcode project file;
- SKU – Stock Keeping Unit, it’s not visible to users and remains up to you to set as it can be an identifier for your account;
- User Access – if applicable, select who can access your app, whether they’re all members of your organization or other specific people.
Step 2: Complete a product page for your app
Detailed information about the app may be added on the Product Page. These are pieces of information that the App Store users can view. The well-prepared metadata may get people to download the app. It consists of the following:
| App name | Name seen by users – choose a name that is short and memorable, up to 30 characters. |
| Icon | The graphic that users firstly see – a standard-resolution iPhone display has a pixel density of 1:1 (or @1x), which means that one pixel equals one point. Check Image Size and Resolution in Human Interface Guidelines. |
| Subtitle | A short summary of your app – the subtitle can be up to 30 characters long and appears below your app’s name throughout the App Store. |
| App previews | A brief clip that shows the features, and user interface of your app and can be seen immediately on the App Store – previews may be up to 30 seconds long, it can display up to three app previews. |
| Screenshots | Images communicating your app’s user experience – you may display up to ten screenshots, they can’t contain transparency. |
| Description | An engaging description that showcases your app’s features – it can have up to 4000 characters and you can always update your app’s description when you submit a new version. |
| Promotional text | The promotional text for your app displays at the top of the description – may be up to 170 characters long. |
| Keywords | Keywords influence where your app appears in search results – choose based on words you think your audience will use to find an app like yours, they’re limited to 100 characters separated by commas and no spaces. |
| Support URL | An URL with support information for the app. |
| Marketing URL | An optional URL with marketing information about the app. |
| Privacy Policy URL | An optional URL containing the app’s privacy policy. |
| Copyright | Copyright information, use the format: YYYY Company. |
| In-app purchases | In-app purchases and subscriptions are displayed in two different areas – it can display up to 20 total products across, the titles are restricted to 30 characters, while the descriptions are limited to 45 characters. Visit the In‑App Purchase website to learn about its implementation. |
| Ratings and Reviews | The form where Apple asks about the frequency in which specific content occurs in the app and generates a rating. Also, the SKStoreReviewController API lets you give users an easy way to provide feedback about your app. |
| Categories | Categories assist users in finding apps that match their needs. The secondary category is optional. |
| Localization | Localize your app description, keywords, app previews, and screenshots, for each of the markets in which you offer your app. |
With product page optimization and unique product pages, you can make your App Store product page even more relevant and effective for customers. Keep an eye for updates with Product Pages Updates. If you want to dive more into ASO techniques and learn some tips, read Applover’s blog post about the App Store Optimization tips.
Step 3: Submit app version for review
After entering all of the essential app data, you may submit a build of your app. The state of the app should be set to Prepare for Submission. By selecting the app on this page, you will be able to view and update the app’s details.
If your software is authorized, the status will be Ready for Sale, unless you choose manual release, in which case you must click Release. The software will be available on the App Store within a few hours after its release.
Ready to launch your iOS app
It may be both exciting and nerve-wracking to submit your app to Apple’s App Store for the first time. Even for experienced developers, submitting an app Store can be a time-consuming process. The key to speeding up the publication process is to have all of the necessary materials on hand ahead of time. Soon many mobile consumers will be able to download your app!


